
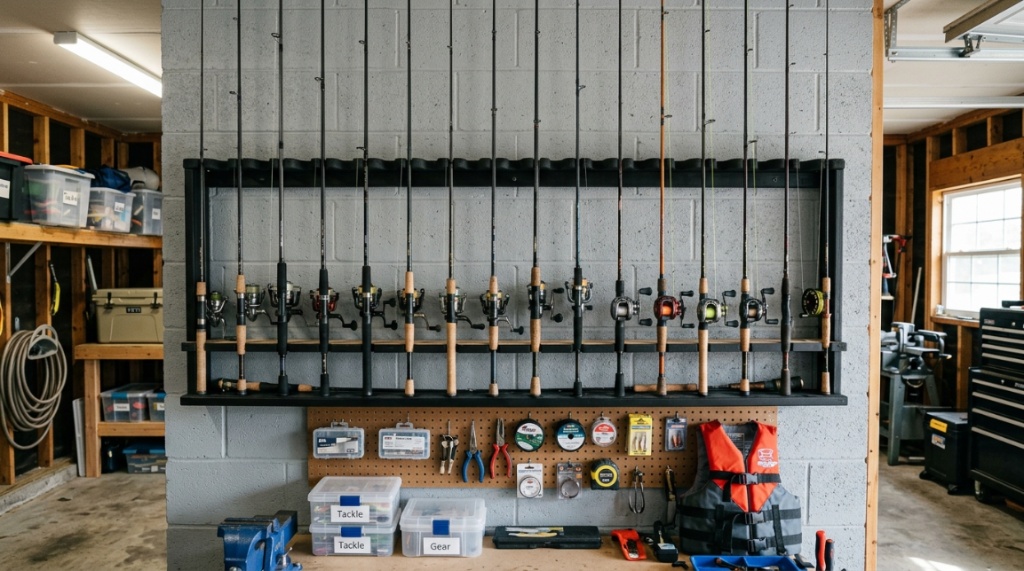
You’ve finally cleared out the garage corner, bought that sleek new rod rack, and laid out your prized collection of St. Croixs and Shimanos. Then reality hits. The mounting hardware looks confusing, the stud finder is beeping erratically, and the last thing you want is a $400 rod crashing to the concrete because of a shoddy install. Sound familiar? This guide delivers practical, step-by-step fishing rod rack mounting tips that go beyond basic instructions. We’ll cover wall types, weight calculations, spacing, and the common mistakes that turn a weekend project into a disaster.
Mounting a rod rack correctly is about more than just screwing wood into drywall. It requires understanding load distribution, choosing the right anchors, and planning for the specific rods you own—from lightweight spinning rods to heavy offshore trolling sticks. By the end of this guide, you will have the confidence to install any rack securely, ensuring your gear stays safe, organized, and easily accessible for years to come.
What Tools Do You Actually Need for a Secure Mount?
Before you start drilling holes, you need the right arsenal. Skipping the proper tools is the fastest way to strip screws, crack drywall, or install the rack at a crooked angle. This section breaks down the essential equipment and the optional tools that make the job dramatically easier.
The Non-Negotiable Essentials
You cannot complete a professional-grade mount without these five items. First, a reliable stud finder with a metal detection mode is critical—it prevents you from drilling blindly into live wires or pipes. Second, a high-quality drill with a variable speed trigger offers control, preventing you from tearing out the drywall. Additionally, a level (either a 24-inch torpedo level or a laser level) ensures your rods remain parallel to the floor. Also, a set of socket wrenches or screwdrivers that match your mounting hardware is necessary. Finally, a pencil and masking tape help you mark obstructions and drill points accurately without leaving permanent marks.
Specialty Tools for Tricky Surfaces
If you are mounting on tile, brick, or metal studs, standard tools won’t suffice. For masonry, you’ll need a hammer drill with a carbide-tipped bit—this makes a huge difference. For metal studs, you should use self-tapping sheet metal screws instead of wood screws. A stud finder with a “deep scan” mode is useful for locating metal studs behind thick plaster. Finally, consider using a digital angle gauge if you need to mount the rack at a precise angle (like on a sloped ceiling). These tools turn a frustrating challenge into a straightforward task.
Which Wall Type Are You Mounting On? Drywall vs. Concrete vs. Studs
The structural integrity of your mount depends 100% on the substrate behind the rack. Mounting directly into drywall without anchors is a recipe for disaster. This section helps you match the correct mounting method to your wall type, ensuring your rack holds the weight with zero sagging.
Mounting Directly into Wooden Studs
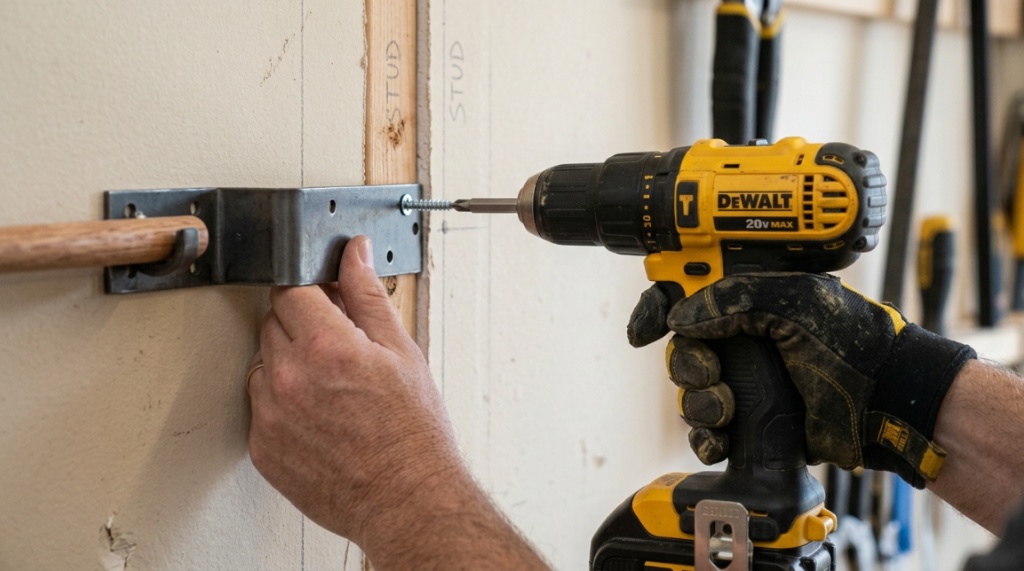
This is the gold standard. Locate the stud using your finder, mark the center, and pre-drill a pilot hole that’s slightly smaller than your screw’s diameter. This prevents the wood from splitting. For maximum holding power, use 2-1/2 inch lag bolts or #10 wood screws. Ensure the screw threads bite deep into the stud—usually at least 1-1/2 inches. If your rack’s mounting holes don’t align with the stud spacing, use a piece of 3/4-inch plywood as a backer board, painted to match, to bridge the gap securely.
Securing to Hollow Drywall (No Studs)
Here, you absolutely cannot rely on drywall alone. Use heavy-duty toggle bolts or snaptoggle anchors rated for at least 50 pounds per fastener. Drill a hole large enough for the folded toggle to pass through, insert it, and tighten until snug. These anchors distribute the weight across a wide area of the drywall. Do not use plastic expansion anchors—they are only suitable for light picture frames, not heavy fishing rods. Test the holding strength by pulling down gently on the rack after installation.
Dealing with Concrete, Brick, or Tile
You’ll need a masonry bit and hammer drill for this. Drill a hole slightly deeper than the anchor’s length, then tap in a sleeve anchor or a blue-tip Tapcon screw. Remember to wear safety glasses—concrete dust is harmful. For tile, place a piece of painter’s tape over the drill point to prevent the bit from slipping and cracking the tile. Always use a washer to distribute pressure on the rack’s bracket.
How Much Weight Can Your Rack Actually Hold?
Rod racks often claim a “weight capacity,” but this is usually for the rack itself, not the mounting hardware or the wall. Understanding the physics of weight distribution is key to avoiding a catastrophic failure.
Calculating Total Weight vs. Dynamic Load
Let’s do the math. Consider a 6-rod horizontal rack. If each rod weighs 1.5 pounds (a typical heavy bass setup), the total static weight is only 9 pounds. However, when you lift a rod off the rack, you apply a downward and outward force that can triple the static weight momentarily. So, a 20-pound static load can become a 60-pound dynamic stress. Therefore, your mounting points should be rated for at least double the total static weight of your rod collection.
Understanding Leverage and Overhang
If your rack sticks out 12 inches from the wall (like some horizontal ceiling mounts), the 12-inch extension creates leverage. A 2-pound rod at the tip exerts a moment of 24 inch-pounds on the mounting bracket. If the rack has only two bolts at the top, this torque acts to pull the bottom of the bracket away from the wall. To counter this, ensure your rack has bolts at the bottom as well as the top, creating a triangular support. If it doesn’t, you might need to add an L-bracket for extra support.
Why Are Spacing and Rod Placement Critical for Longevity?
Proper spacing isn’t just about aesthetics; it’s about preventing line tangles, rod tip damage, and maintaining the spine alignment of your blanks. Here is the method to determine the perfect layout for your specific gear.
Determining the Correct Distance Between Rods
Spacing depends on the reel size and handle length. For spinning reels, you need at least 4–5 inches of clearance to avoid the bail and handle hitting the next rod. For baitcasting reels, 3–4 inches usually suffices. Measure the widest reel you own and add 2 inches of buffer. If you are storing rods with large trolling reels (like Penn Senators), they may require 8–10 inches of spacing. Look for adjustable racks that allow you to customize this distance.
Vertical vs. Horizontal Mounting: Which is Better?
Vertical mounts save floor space and are great for surf rods, but they require high ceilings and the rod tips often collect dust. Horizontal mounts are better for rod health—they put less stress on the guides. For horizontal mounting, ensure the rod is supported at both ends—near the handle and near the tip—to prevent the rod from bowing under its own weight over time. Never store rods with reels attached in a vertical position for long periods, as this can cause oil to seep into the rod blank.
| Mount Type | Best For | Spacing Rule | Key Risk |
|---|---|---|---|
| Horizontal Wall | Most freshwater rods | 4–5 inches | Handle collision |
| Vertical Ceiling | Surf & offshore rods | 3–4 inches | Tip damage |
| Angled Wall | Multi-purpose storage | 6–7 inches | Leverage stress |
Can You Mount a Rod Rack in a Garage or Shed?
Garages and sheds present unique challenges—temperature swings, humidity, and often unfinished walls. But they also offer robust framing (studs) that are easier to locate. This makes them ideal locations if you prepare the surface properly.
Handling Temperature and Humidity Fluctuations
Extreme heat can soften the foam padding on your rack, causing it to deform. Cold can make plastic brackets brittle. To counter this, choose a rack made from corrosion-resistant aluminum or powder-coated steel. For humidity, ensure the area is well-ventilated. Moisture can cause rust on rod guides and mildew on cork handles. Silica gel packets placed near the rack can help absorb excess moisture.
Mounting on Unfinished or OSB Walls
Many sheds use OSB (oriented strand board) or plywood sheathing. While these boards hold screws well, they are not as strong as solid wood studs. You can mount directly to OSB if the board is at least 1/2-inch thick, but use large washers on the backside of the rack to distribute the load. If the wall is just studs with no sheathing, mount a 2×4 horizontal crossbeam between the studs and attach the rack to that.
What Is the Best Way to Mount a Ceiling Rack?
Ceiling racks are perfect for garages where wall space is unavailable. They pose a greater risk because a falling rod from above is dangerous. Therefore, the mounting process requires extra meticulousness and reinforcement.
Securing the Ceiling Joists Properly
Use a stud finder that can scan through drywall to locate ceiling joists (which are usually spaced 16 or 24 inches apart). Mark both sides of each joist, not just the center. Use lag screws or heavy-duty eye bolts that are at least 3-1/2 inches long to penetrate the joist by a minimum of 2 inches. For garages with open trusses, you can use ratchet straps as an alternative, but ensure they are rated for overhead suspension,Once your garage setup is fully organized and your gear is safely mounted, you might also want to look into getting a Fishing Kayak for Easy Fishing Access so you can effortlessly transition from storage straight to the water.
Utilizing Pulley Systems for Easy Access
If you’re mounting a ceiling rack over a boat or truck, consider a pulley system. This allows you to lower the rack to load/unload rods and raise it back up. When installing, anchor the pulleys to separate joists and use marine-grade rope or steel cable that won’t fray. Always label the ropes to know which one releases which end, preventing an uncoordinated drop.
How to Avoid Common Mounting Mistakes
Most DIY users make the same three errors: misaligning holes, over-torquing screws, and failing to re-check level after the final tighten. This section is your pre-flight checklist to avoid frustration.
Measuring Twice, Drilling Once
Layout the rack on the floor and measure the distance between the mounting holes. Transfer these measurements to the wall with a level. Use a piece of painter’s tape to create a “target” for your drill bit—this prevents the bit from walking. Always drill a shallow pilot hole first and check that it aligns with the marked center before going deeper. If you mess up, fill the hole with a wooden dowel and glue, then re-drill.
Choosing the Correct Screw Length
Most users screw up (pun intended) with screw length. For a stud mount, the screw must be long enough to pass through the rack bracket, the drywall (usually 1/2-inch), and into the stud by at least 1-1/2 inches. That totals about 2-1/4 inches. Using a 1-inch screw will strip out quickly. When using toggle bolts, ensure the screw length matches the bracket thickness plus drywall, but not so long that it presses against the back of the rack.
How to Maintain Your Rack After the Mount
Once your rack is up, a little maintenance goes a long way. The hardware can loosen over time due to vibrations from slamming doors or the natural movement of the house. Establishing a simple inspection routine ensures long-term safety.
Periodic Tightening and Rust Prevention
Every 3-4 months, check the screws or lag bolts with a socket wrench. Do not over-tighten—just ensure they are snug. For outdoor or garage racks, apply a light coating of WD-40 or a silicone spray to the screws and brackets to prevent rust. Wipe down the rubber or foam sleeves with a damp cloth to remove dirt that can hold moisture against your rod finishes.
Upgrading Based on Your Gear Evolution
As your collection grows, you might add heavier rods. Monitor the flex of your rack when you load it. If you notice any sagging at the center (for a long horizontal rack), add a center support bracket. It is wiser to reinforce now than to replace a rack that has bent under fatigue. Also, check the protective coating—if you notice chipping, touch it up to prevent rust from spreading.
Is It Better to Buy or Build a Custom Rod Rack?
The build-vs-buy debate is common. While DIY offers custom sizing, it often lacks the precision and finish of a professional product. This decision impacts mounting complexity, so it’s worth careful consideration.
The Case for a DIY Approach
Building your own rack allows you to customize the dimensions perfectly to fit a specific wall alcove or to hold unconventional rod lengths (like 12-foot surf rods). Using PVC pipes or wood blocks can be cost-effective. However, the DIY route requires precise woodworking skills to ensure the brackets are perfectly aligned. If your holes are off by a quarter-inch, the rack will look crooked, and rod placement will be tight. Also, DIY racks often lack protective foam, so you must line the slots with felt or pipe insulation.
Why High-Quality Pre-Built Racks Win for Most
Pre-built racks from reputable brands use engineering-grade plastics and corrosion-resistant finishes. They also include the correct mounting hardware, which is often inadequate in DIY setups. They feature universal mounting hole patterns that work with most standard stud spacing. Ultimately, a reliable pre-built rack reduces installation time by 50% and offers a polished look. For a summary of top-rated options, you can explore comprehensive fishing rod rack mounting tips and product comparisons that answer common setup questions.
Frequently Asked Questions
Can I mount a rod rack on a plaster wall?
Yes, but it requires extra care. Plaster is harder but more brittle than drywall. You must drill a pilot hole using a masonry bit to avoid cracking. Use a molly bolt or a toggle bolt that expands behind the plaster. Never use hammer-in anchors on plaster, as the shock can cause cracks.
What if my stud finder doesn’t work on lath and plaster?
Lath and plaster confuses most electronic stud finders. Instead, try using a strong magnet to locate the metal lath nails holding the plaster to the studs. Alternatively, tap the wall with your knuckles – a solid sound indicates a stud, while a hollow sound indicates a void.
How many rods can a typical horizontal rack hold?
Most quality horizontal racks can safely hold 4 to 8 rods, depending on the spacing. The weight limit is more about the wall anchors than the rack itself. Read the manufacturer’s spec for the maximum weight per rod cradle and never exceed half of the total rated limit to account for dynamic movement.
Is it safe to store rods with reels attached?
Yes, for horizontal mounts, it is generally safe. For vertical mounts, it is risky. Long-term vertical storage can put strain on the reel seat and cause line to unspool. If you must store vertically, always remove the reels and store them separately in padded cases.
What is the best height to mount a rod rack?
Measure from the floor to your waist (typically 36–40 inches) for the lowest rod. Then add the clearance needed for the longest rod to swing without hitting the ceiling. A good rule is to mount the rack so the bottom of the lowest rod sits at least 30 inches from the floor to avoid accidental kicks.
Should I use a rubber or foam rack to protect the rod finish?
Yes, always use padded cradles. Rubber systems absorb shock and prevent scratches on epoxy finishes. Foam is lighter but can absorb moisture if it gets wet; if using foam, ensure it is closed-cell foam. Avoid bare plastic or metal, as they can abrade your rod’s clear coat over time.
How do I mount a rack without drilling holes?
For a temporary solution, use heavy-duty 3M Command hooks designed for garage storage, rated for 10-15 pounds per hook. However, they are not reliable for rods with large reels. The adhesive can fail over time with temperature changes. It is better to drill for a permanent, secure solution.
Conclusion
Mounting a fishing rod rack like a pro is a systematic process that begins with the correct tools and an honest assessment of your wall structure. By measuring studs, calculating dynamic loads, and spacing rods to accommodate your reels, you eliminate the risk of damage to your expensive gear. Whether you choose a ceiling mount for space efficiency or a horizontal wall mount for easy access, the principles remain the same: solid anchors, level brackets, and regular maintenance. Don’t rush take the 30 extra minutes to find a stud or install toggle bolts properly. Your rods will thank you with years of faithful service. Now, grab that drill, line up your holes, and secure your collection with confidence.